Stereo with one amp, wet/dry, no microphones, any speaker you can think of, consistent beautiful tone, low volume…a guitarists dream!
It’s always been a passion of mine to be able to hear what my guitar sounds like in stereo. I bought my first stereo effects pedal, a DOD FX747 Supersonic Flanger way back in 2000. Since then, I’ve been on a mission to find a good stereo solution that wouldn’t involve two separate amps. More recently, I’ve been trying to find a good way to keep my tone in tact when playing quietly, at bedroom levels.
The next logical step was to find a way to record it all. The thought of background noise and acoustic treatment seemed daunting. My home is never quiet enough to record anything as well as worries about mic placement and what microphones to buy. All these things have always put me off setting up a studio so I needed an alternative.
In early 2016, I found the answer to my questions. In this article I’ll explain the basic gear I use and the many benefits it has to offer.
In short
I’ll be talking about how to replace the speaker cabinet’s function within the signal chain. We’ll emulate it with an impulse response (IR).
- The reactive load will replicate the load that the cabinet has on the amplifier. It will soak up the power that the amplifier puts out and it’ll convert that power into a line level signal.
- A cabinet simulator then takes the line level signal from the reactive load and sends it through a very small .WAV file called an impulse response. This makes it sound like it’s being sent through a real cabinet.
An impulse response is the reaction of any dynamic system [in this case a speaker cabinet] in response to some external change [an amplifier signal]. — https://en.wikipedia.org/wiki/Impulse_response
Benefits
- Beautiful valve driven tone at reasonable volumes at home
- Silent recording
- Headphone practice
- Full use of the amplifiers pre-amp and power amp stages
- Stereo (if you want it) or mono
- Wet/Dry/Wet or Wet/Dry or Wet/Wet (whichever you want) — I’ll go into detail about my wet/dry setup in a future post.
- Use of any speaker cabinet (impulse response) you can find
- No need to buy or use microphones to mic up for recording
- No microphone placement hassle
- No background hiss from badly soundproofed rooms
- Bad room acoustics won’t affect your recorded sound
- Same consistent tone for practice, recording and live use
Need I go on?
The list is endless and so are the possibilities.
Essential gear
- Amplifier (tube amps benefit most from this setup)
- Reactive load box (not a traditional “resistive” load box/attenuator)
- Speaker cable to go from the amp to reactive load
- Cabinet simulator software (plugin) or a device/pedal that can load impulse responses
- Headphones or powered monitors/computer speakers
Amplifier
The reason I pursued this tonal nirvana was because I liked the sound of a valve amplifier. I liked how it felt under the fingers. The response when the note compresses and punches you in the face as it jumps out of the speaker. Nothing sounds like a real valve amplifier but the drawback is the sheer volume it takes to get you there. At low volumes, a valve amplifier can sound thin and dry, with very little life.
The beauty of this setup is that you can have your dream amplifier, whether it be a 5w boutique or a 100w metal grilled head.
The power amp section often gets sacrificed with complex setups like this (pre-amp out to stereo effects to do wet/dry), but in this setup, it doesn’t have to be. It’s an integral part of the sound and to lose it would be detrimental.
Reactive load
This part is vital. There are lots of options here, but through research I found that the most natural sounding load box is a “reactive” load. I don’t pretend to know the science behind why this is, so here’s what Premier Guitar say about it…
Reactive Vs Resistive.
When a speaker — let’s say in an open-back 1x12 cab — is connected to a tube amp, it has a unique relationship with the amp. Think of it as a back-and-forth conversation between the amp and speaker/cab. Your particular amp, cab, speaker, and what you play influence this dialog. This is called the impedance curve, and it’s a measurable variable. Take the same speaker and load it into a closed-back 4x12 cab, and that impedance curve changes. The amp reacts differently than it did with the 1x12. So multiple things affect the tone and feel: amp, cabinet, speakers, and impedance curve.
A reactive load or reactive attenuator lowers or completely loads down an amp’s output while maintaining the impedance curve, making the amp feel, sound, and respond similarly to when it’s connected directly to a cabinet. Resistive attenuators and loads eliminate that impedance curve. As a result, the tone and feel of the whole rig changes. Most players find that as attenuation increases on a resistive attenuator, the tone is affected, usually becoming more compressed and dark. Transparency is a big plus for me, so I’m a fan of reactive attenuators. — (http://www.premierguitar.com/articles/22402-tone-tips-the-lowdown-on-load-boxes-attenuators-and-reamps)
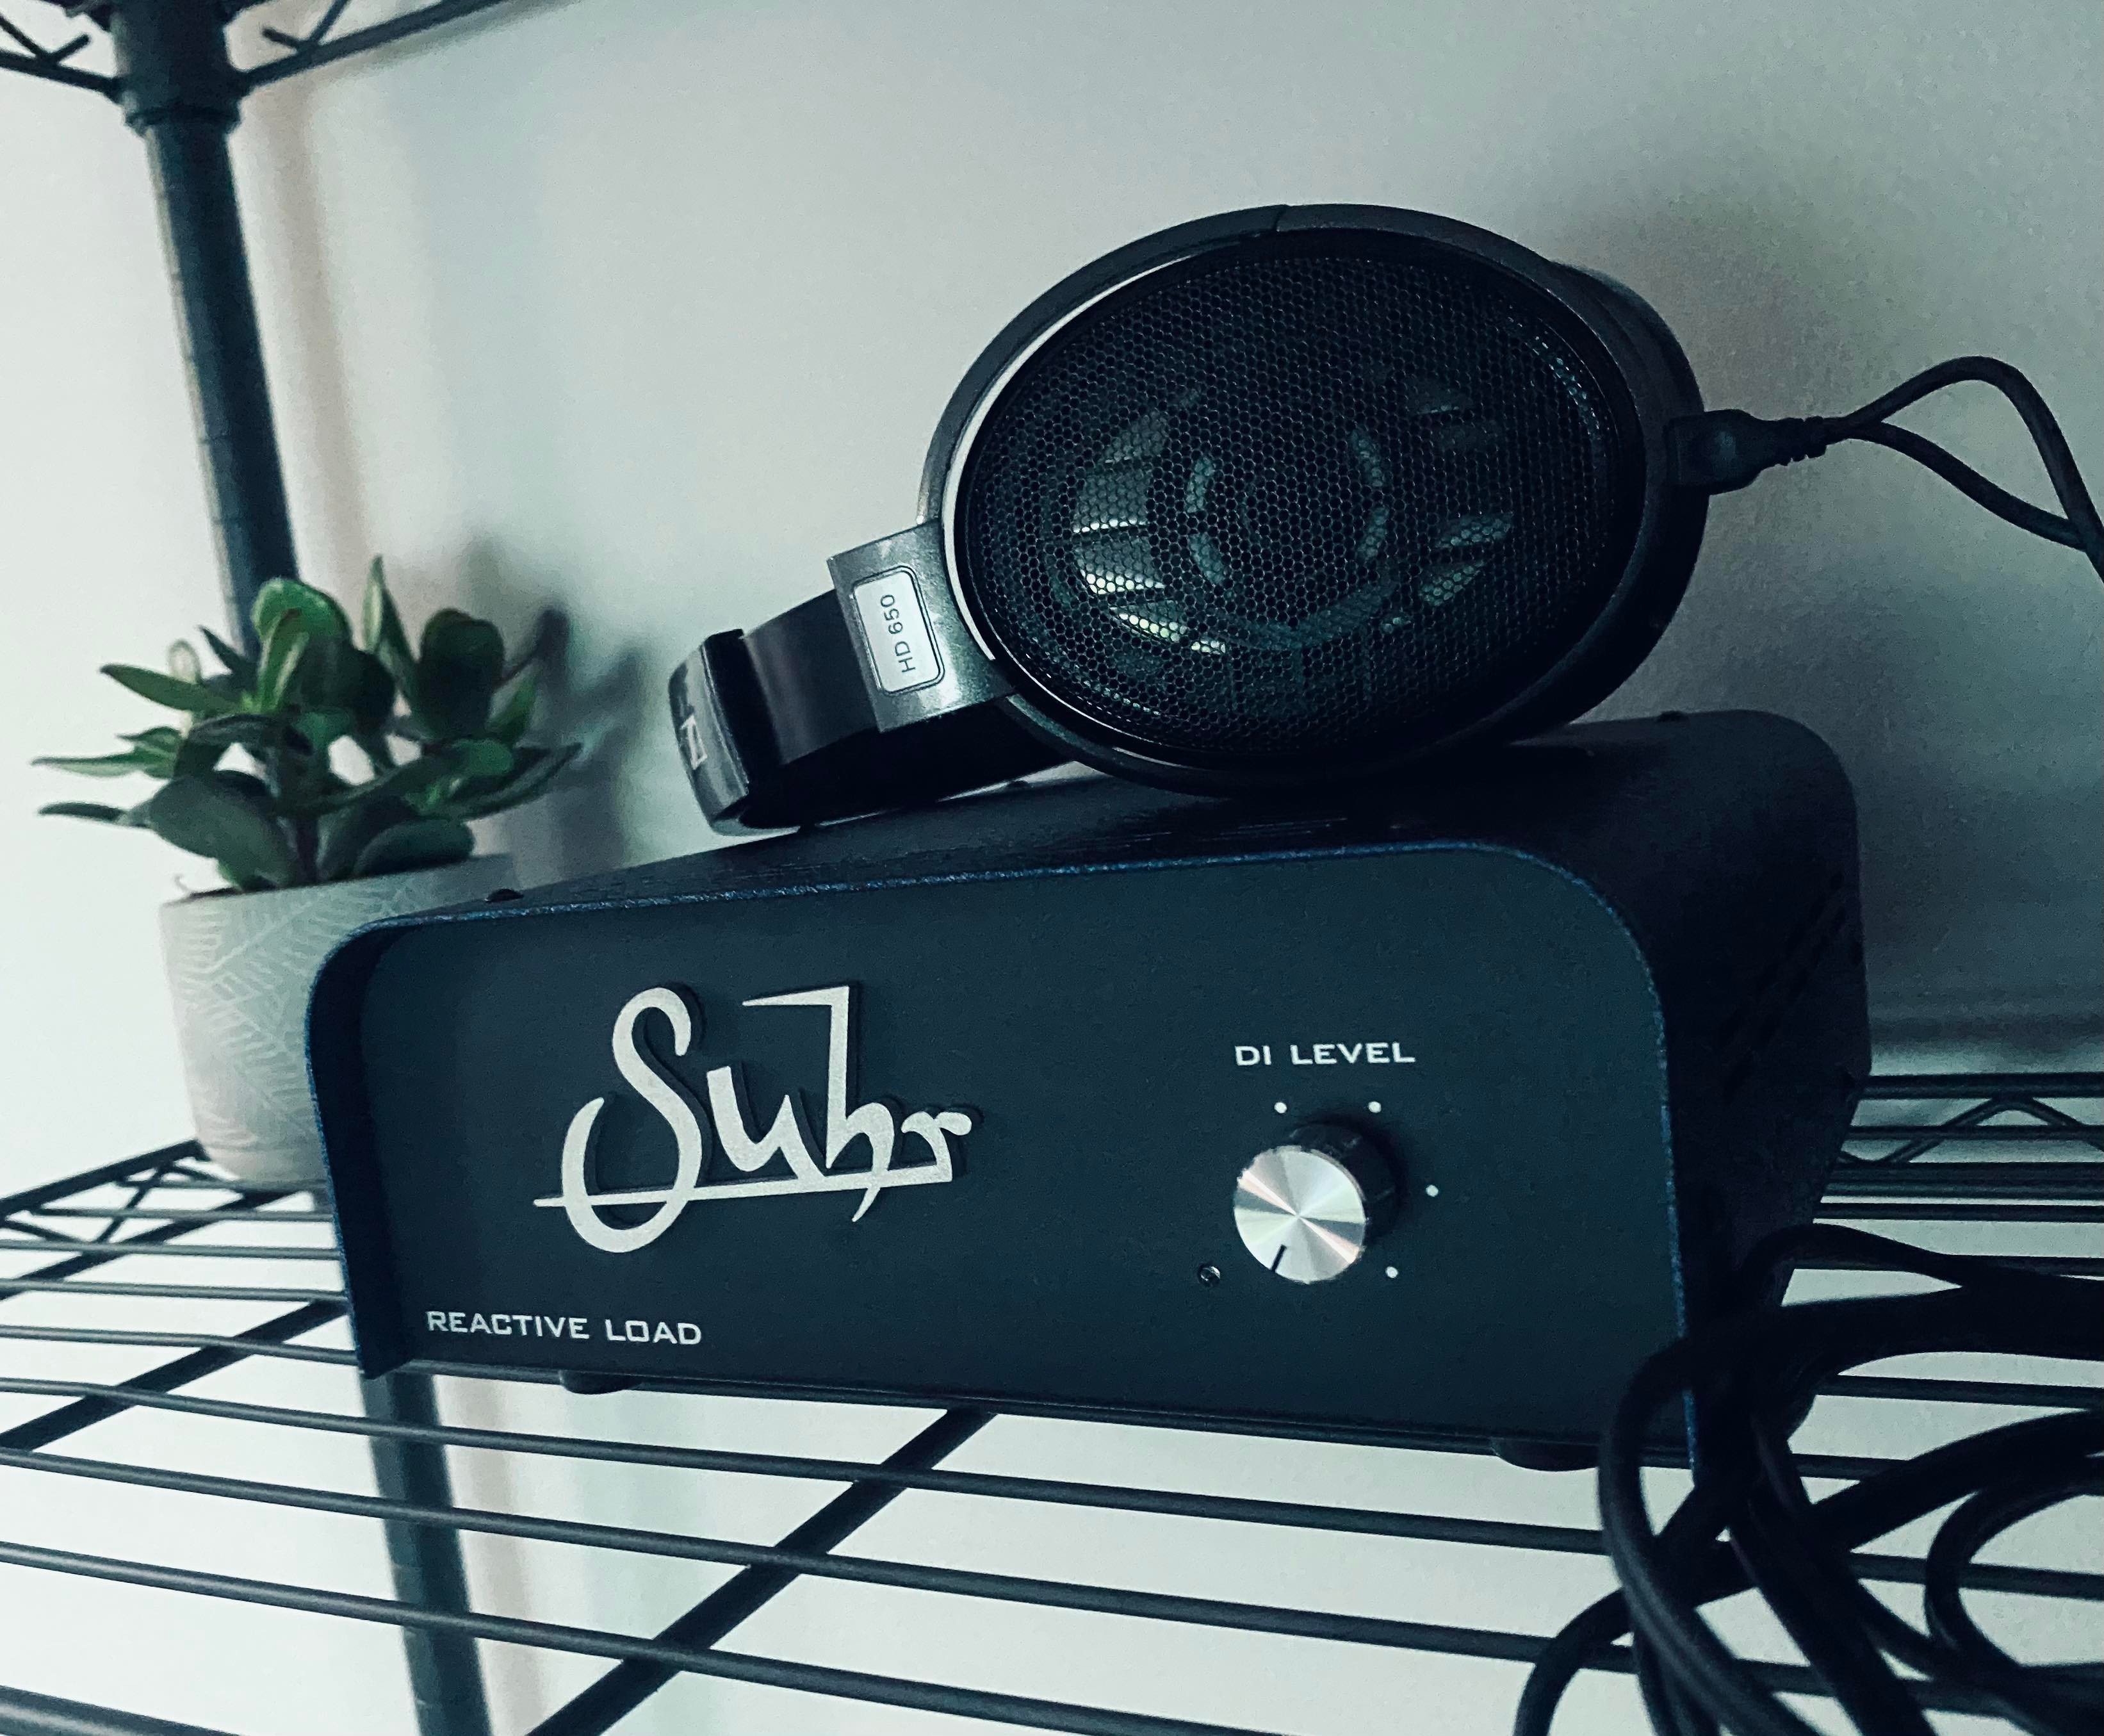
Suhr Reactive Load and Sennheiser HD650 open back headphones. Image courtesy of Will Bowden (Instagram @willtombowden).
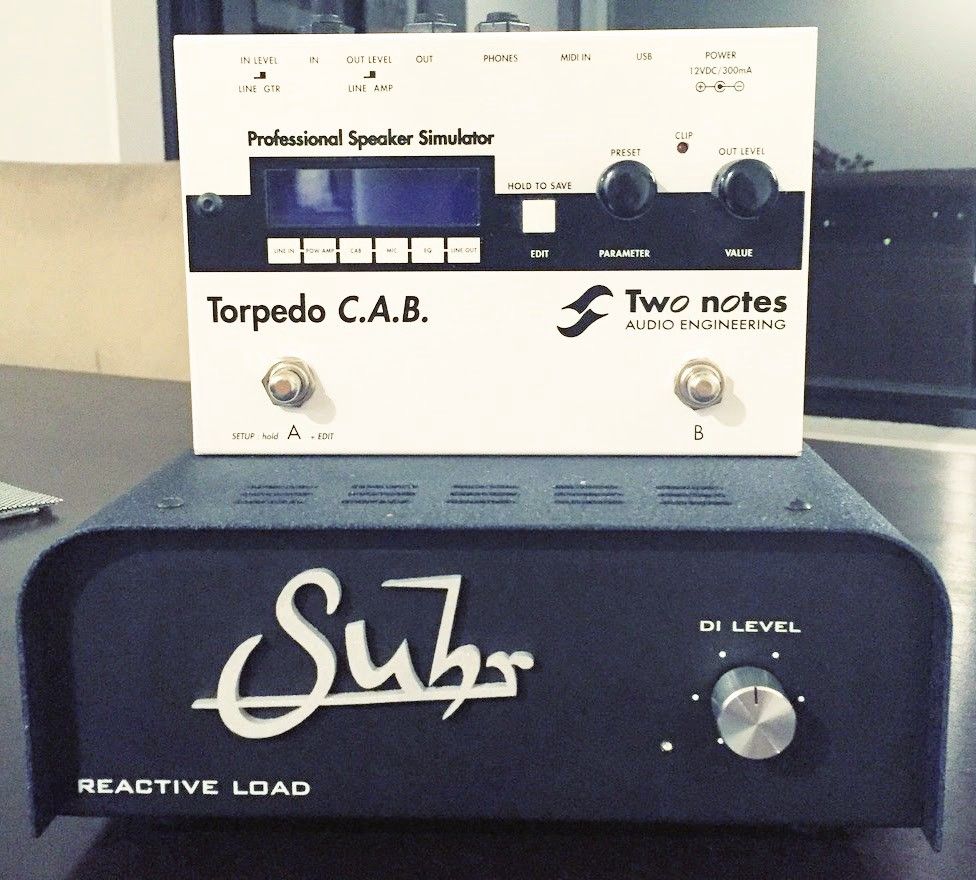
I use a Suhr Reactive Load. However, the Two Notes reactive load boxes are well regarded, as is the Fryette Power Station.
Cabinet simulator
If you’re sending your guitar signal through a computer, for use in a DAW, for example, then you have the option of using software based cabinet simulation — through IR loading software.
I use hardware for this though, because I don’t have a particularly powerful computer and want to take some pressure off the processor. With hardware, I also have the option of taking it outside of my studio — for use in at rehearsal or live.
The Two Notes Torpedo C.A.B. is a superb, pedal-based impulse response loader. Comes with loads of cabinet and microphone IRs, and uses the amazing Two Notes software to configure it all. There’s also hundreds of third party IR’s available from the likes of Ownhammer and 3 Sigma Audio. My personal favourite is Redwirez. These third party IRs can be loaded into the C.A.B..
There are a few functions that are taken care of here.
- The cabinet simulation — you choose the cabinet you want, from a 1960’s Marshall 4x12 or a an old Fender Twin 2x12, the list is endless.
- The microphone — you have vast array of microphones to choose from whether it be a Sure SM57 or a large diaphragm vintage microphone. If you can find an IR that’s using your favourite microphone, you can use it.
- Microphone placement — whichever microphone you use, you have the ability to place it anywhere you like — virtually. My favourite placement is about an inch away from the centre of the cone, but it can go anywhere, including behind the cab.

Two Notes Wall of Sound — free software to configure your speaker selection, mic and mic placement and used to send the IR to the Torpedo C.A.B.
It’s worth noting that if you use the Two Notes software, you can configure the above on screen and it’s like mixing your own custom impulse response. If you prefer the sound of third party impulse responses, such as Redwirez, then you get a pack of sound files that are appropriately named for each mic placement. Trial a few and load your favourite into a preset.
Redwires recommends that you usually start with the microphone at 0.5" away from the cap edge. The filename for this typically looks like “HiwattSE4123-Fanes-SM57-CapEdge-0_5in.wav”. It includes the cabinet name, the microphone used and its placement.
Redwirez also published a handy starting point guide called “Dialling in your tone” (PDF). This has an easy to use reference table with the best IRs to use, with which microphones and mic placement.
Mixing impulse responses
Using something software from Two Notes called BlendIR, it is possible mix two impulse responses together. I’ve never really liked the results when I’ve mixed two different cabinet IRs, eg. Marshall and Mesa. But I always like to experiment with mixing different microphones on the same cabinet. Much like they do in real recording studio environments.
My favourite results have been to mix a Sure SM57 at the cap edge with a Royer 121 ribbon microphone on the cone. The SM57 is clinical and the R121 a little warmer, so they make a good mix. Experiment and make your own.
Investment of time — the frustration factor
Why doesn’t it sound like my amp and cab?
By this point, I had invested a lot of time and a bit of money on the hardware and I got frustrated that I didn’t find my sound instantly. Be warned it takes time to find the right IR and to get used to the feel/sound.
Think about it, nobody ever hears your guitar setup the same way you do. You play live and your amplifier has been mic’ed up and sent through the P.A. You’re in a recording studio and the amp is mic’ed up and sent through the desk. On an MP3 recording, your sound doesn’t sound like you’re sitting in front of your speaker cabinet, feeling the speaker move. That’s the way you’ll need to approach and embrace this setup. Approach it as if you’re listening in the control room of a recording studio. As if you’re listening to someone playing your gear in all its glory, in the room next door.
It takes time to find the right speaker cabinet IR for your amp. A Rectifier cabinet might not sound great with a Marshall JTM45, neither will a Marshall 4x12 with a Fender Twin. You need to look for that perfect match.
I recommend trying some Ownhammer and Redwirez impulse responses to help with this — I found the Two Notes IRs weren’t for me.
This short clip was used with permission from Amund Blix, a superb guitarist and the person who sold me on the idea of using the Suhr Reactive Load and IRs. Amund uses the Suhr Reactive Load and IRs with his EVH amp in this clip and it sounds incredible! Notice how the clean and dirt sounds sound natural and are fully kept in tact.
Stereo
To achieve stereo, most guitarists use two amplifiers. With this setup, you don’t have to. Route the line level signal through the cab simulator (IR loader — Torpedo C.A.B.) and into your stereo effects (modulation, delay, reverb etc.). Then stereo out into your monitors. The difference between mono and stereo is night and day. Of course, you need stereo effects to make the most of it. John Petrucci (Dream Theater) once said that every guitarist should experience stereo at least once, I agree.
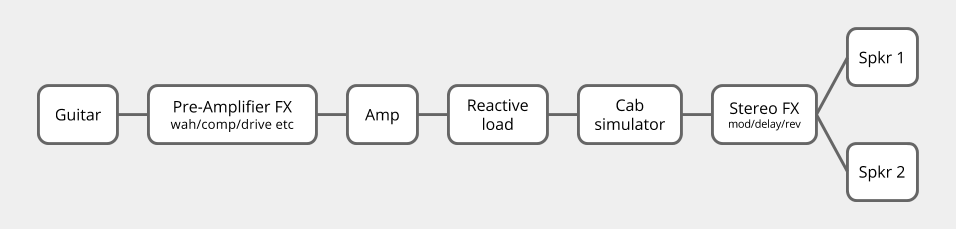
Signal chain: Guitar > Pre-amplifier FX > Amplifier > Reactive Load > Cab Simulator > Stereo FX > Speaker 1/2 (Left/Right)
In conclusion…
This has been the very best investment of time, research and money I’ve ever made in my setup.
- I’ve got the sound I’ve always dreamt of
- Clean and dirt tones stay in tact and don’t sound fake or sterile
- It sounds the same every time I switch it on and wherever I choose to set it up (home practice, rehearsal, live etc.).
- I get it at any volume I like, even silent with headphones.
- I can record it at any time I wish, instantly, which is great when I have new ideas and feel inspired.
- I have a full stereo spread which sounds sublime — this sounds better than when I had a two amp stereo setup.
Try it for yourself, there are inexpensive ways of doing this and I’ll write that up in another post. I had to go for the best setup I could afford and I’m happy I did so. But this sort of setup absolutely CAN be done on a tighter budget.
If you need any further reason to explore this idea, please watch Pete Thorn’s incredible demo (below). In this video, Pete creates his own impulse response based on his favourite speaker. You’ll notice there’s no audible difference between the physical speaker and the impulse response. He goes on to explore how different load boxes affect the sound of the amplifier. He then let’s us hear the results for ourselves. This is how I ended up with the Suhr Reactive Load. Any questions, just ask. Enjoy!
Also, don’t forget to check out “Reactive load and Impulse Response (IR) speaker cabinet simulation question and answer” for answers to popular questions on this subject.
Pete Thorn explains using load boxes and impulse responses with guitar amps to achieve great recorded guitar tones, without cabs or microphones!